Every kayaker capsizes. Not maybe—definitely, eventually. The paddlers who stay safe aren’t the ones who never flip; they’re the ones who practiced getting back in before they ever needed to.
Kayak self-rescue is the skill set that separates a scary situation from a manageable one. Whether you’re on a calm lake a quarter mile from shore or paddling a coastal route, knowing how to recover from a capsize without outside help is the single most important safety skill you can build.
This guide covers the core techniques—scramble rescue, paddle float rescue, heel hook entry, and more—plus cold water safety awareness and how to structure your practice so the skills actually stick when you need them.
Why Self-Rescue Matters More Than You Think
Most recreational kayakers assume a capsize is unlikely enough that they don’t need to prepare. That’s backwards. Here’s why:
- Capsizes happen fast. A wake from a motorboat, a sudden lean to grab a water bottle, an unexpected wave—you can go from stable to swimming in under a second.
- A PFD keeps you alive, but not dry. Your life jacket will keep you at the surface, but it won’t get you back in your boat. That’s on you.
- Adrenaline degrades your motor skills. Techniques you’ve never practiced will fall apart under stress. Techniques you’ve drilled will hold.
- Cold water changes everything. In water below 60°F, you may have only minutes of effective swimming ability before cold incapacitation sets in. (Read our full cold water immersion survival guide for a deeper look.)
Self-rescue isn’t a skill you learn in case of emergencies. It’s a skill you learn so that capsizing becomes an inconvenience rather than an emergency.
Essential Gear Before You Practice
You don’t need much to practice self-rescue, but what you need, you need to have right. For a full rundown of what to bring on every paddle, see our 10 essential kayaking gear checklist.
Personal Flotation Device (PFD)
A properly fitted PFD is non-negotiable. It should be USCG-approved, snug enough that it can’t ride up over your ears when you tug the bottom hem, and comfortable enough that you’ll actually wear it. A PFD sitting in your bow hatch does nothing.
Paddle Float
An inflatable paddle float attaches to one blade of your paddle and creates a temporary outrigger. It’s essential for the paddle float rescue and worth keeping attached to your stern deck on every paddle. Foam paddle floats exist but inflate faster—worth the trade-off for whitewater or rough water paddlers.
Spray Skirt (If You Have a Sit-In Kayak)
Spray skirts keep water out of your cockpit, which makes flipping and recovering much cleaner. Practice wet exits with your spray skirt on before you ever go out on open water. The grab loop must be easy to reach—tuck it outside the coaming, never inside.
What to Wear
If the water temperature is below 60°F, wear a wetsuit (full coverage for 50–60°F water, drysuit for anything colder). The rule of thumb: dress for the water temperature, not the air temperature. A warm sunny day doesn’t change how cold 48°F lake water is.
The Wet Exit: Step Zero
Before you can practice self-rescue, you need to be able to exit a capsized kayak cleanly. This is called the wet exit, and it’s simpler than it sounds.
For sit-in kayaks with a spray skirt:
- When you capsize, stay calm. Tuck forward against the deck to protect your head from rocks or the hull.
- Locate the grab loop of your spray skirt and pull it forward and up to release the skirt.
- Place both hands on the cockpit rim beside your hips.
- Lean forward, push the boat away with your hands, and let your legs follow out.
- Come to the surface holding your paddle.
For sit-on-top kayaks: Much simpler—just fall out. The boat stays right-side up most of the time, or you simply swim to it after. No spray skirt, no wet exit drill needed.
Practice your wet exit at least five times in shallow, warm water before you worry about self-rescue techniques. You want it to feel automatic.
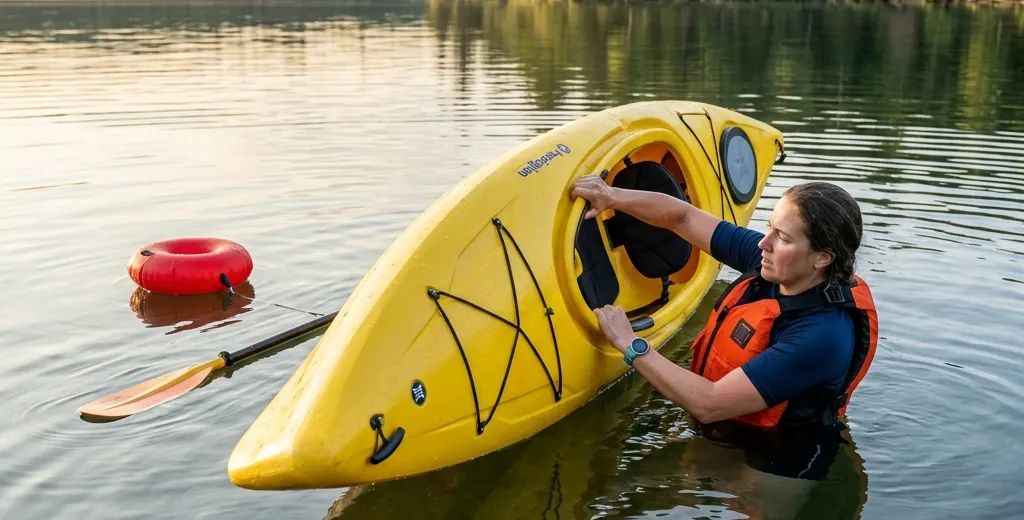
The Scramble Rescue: Easiest Method for Recreational Kayaks
The scramble rescue works best on wide, stable recreational kayaks and sit-on-tops. It requires no gear beyond what you’re already wearing.
When It Works Best
- Boats 26 inches wide or wider
- Calm water (lakes, slow rivers, protected bays)
- Sit-on-top kayaks
- Paddlers with decent upper body strength
Step-by-Step
1. Right your boat first (if it’s upside down) Swim to the upside-down hull and flip it over by grabbing the far edge and pushing it away from you as you pull toward you. Your paddle should be within arm’s reach or looped to your wrist via a leash.
2. Position yourself at the side of the cockpit Float on your back or side next to the cockpit, perpendicular to the boat. Don’t approach from the bow or stern—you want to be directly beside the seat.
3. Kick and pull yourself up Kick strongly with your legs while pulling your chest up and over the hull. Think of it like pulling yourself onto a paddleboard. Get your hips above the waterline before trying to swing your legs in.
4. Swing your legs into the cockpit Once your belly is on the deck, rotate your body to swing your legs over and into the cockpit. Sit up slowly—the boat will feel unstable.
5. Bail out any water Use a hand pump or bilge pump to remove water from the cockpit before you resume paddling. Water adds weight and reduces stability.
Common Mistakes
- Grabbing the cockpit rim instead of the hull edge. You’ll pull yourself off-balance. Grip the far edge of the hull.
- Trying to lift yourself straight up. Go horizontal first—slide across the deck, don’t try to stand.
- Rushing. Slow down. Panic costs more time than a few extra deliberate seconds.
The Paddle Float Rescue: Solo Recovery for Touring Kayaks
Narrower sea and touring kayaks are harder to scramble onto—the hull doesn’t offer a stable landing. The paddle float rescue solves this by creating an outrigger that stabilizes the boat while you re-enter.
What You Need
- Inflatable paddle float (attached to stern deck bungees)
- Your paddle
- A stirrup or foot loop (optional but helpful)
Step-by-Step
1. Right your capsized kayak Same as the scramble: swim to the hull, flip it. Keep your paddle close—loop your wrist through the paddle leash before capsizing if possible.
2. Inflate the paddle float and attach it Pull the paddle float from your deck bungees and slip it over one blade of your paddle. Inflate it fully—partially inflated floats fail under body weight.
3. Lay the paddle across the rear deck Position your paddle perpendicular to the cockpit, float side away from you. Some paddlers loop a paddle leash or bungee around the hull to keep the paddle from sliding. This setup creates your outrigger.
4. Position yourself between the paddle and the boat Float on your back behind the cockpit, facing the stern. Your hands should grip the paddle shaft and the cockpit rim simultaneously.
5. Kick and pull yourself up Kick hard, pull toward the deck, and slide your body horizontally across the rear deck—similar to the scramble. Keep your weight toward the paddle float side to prevent rolling the boat.
6. Swing your legs in Rotate and swing your legs into the cockpit. Keep one hand pressing down on the paddle for stability until you’re seated and balanced.
7. Pump out water and deflate Once seated, use your bilge pump to drain the cockpit. Then deflate the paddle float and stow it.
Practice Tip
Set up your paddle float in your driveway and time yourself. You want to be able to inflate and attach the float in under 60 seconds—cold hands in real conditions slow you down further.
The Heel Hook Entry: When the Scramble Is Too Hard
The heel hook is a variation of the scramble rescue that uses leg mechanics instead of raw upper body strength. It’s particularly useful for smaller paddlers or those who can’t easily pull their torso over a hull.
How It Works
- Float on your back beside the kayak at cockpit level.
- Reach across the hull and hook your far heel over the far edge of the cockpit rim (not the hull—the actual cockpit rim).
- Use that heel as an anchor and pull your hips up and over the hull in one rolling motion.
- Follow through with your upper body, rotating into the seat.
This motion leverages your hip flexors and leg strength rather than arm strength alone. It takes a few practice reps to get the body mechanics right, but once it clicks, it’s often faster than the standard scramble.
The Cowboy Scramble: Open Water Technique for Sit-On-Tops
If you paddle a sit-on-top in open water—including kayak anglers—this technique lets you remount from deep water without any gear.
- Swim to the stern of your kayak.
- Pull yourself up onto the stern like pulling yourself onto the back of a floating log—chest over, legs trailing.
- Inch forward, straddling the hull, “cowboy style,” until you reach the seat.
- Swing your legs into the footwells and sit up slowly.
It’s awkward the first five times. It works reliably once you’ve practiced it.
Rolling vs. Self-Rescue: Understanding the Difference
An Eskimo roll (or “kayak roll”) is a technique that flips a capsized kayak upright without exiting the boat—you stay in the cockpit throughout the capsize and recovery. It’s the fastest rescue method by far, but it takes weeks to months to learn and doesn’t work for everyone. For a full tutorial, see our step-by-step kayak roll guide for beginners.
Key differences:
| Method | Learning Curve | Speed | When It Works |
|---|---|---|---|
| Scramble rescue | 1 practice session | 2–5 minutes | Wide boats, calm water |
| Paddle float rescue | 2–3 sessions | 5–10 minutes | All boat types, solo |
| Heel hook entry | 2 sessions | 2–4 minutes | Moderate width boats |
| Eskimo roll | Weeks to months | Under 5 seconds | Requires ongoing practice |
Even paddlers who can roll confidently should practice wet exits and self-rescue. A roll fails under stress for plenty of experienced paddlers. Self-rescue is your backup backup.
Kayak Self-Rescue for Anglers: Unique Considerations
Fishing kayaks present specific challenges during a capsize that deserve their own section. Our complete kayak fishing guide for beginners covers gear setup and safety in detail.
Managing Gear in the Water
- Rods in rod holders typically stay put during a capsize if the kayak stays near you—but they can be hazards if they fall loose.
- Tackle trays are waterproof containers; don’t spend time in the water organizing them. Get in the boat first.
- Electronics (fish finders, GPS) should be mounted low and secured with locking mounts. Panic-grabbing them during a rescue is how they get dropped.
Pedal Drive Kayaks
Pedal-drive systems (Hobie, Old Town, Wilderness Systems) often make scramble entries harder because the rudder system or fin housing protrudes below the hull. Practice your specific entry technique with the drive installed.
Stabilizers and Outriggers
If you fish from a narrow sit-inside, outrigger floats dramatically reduce capsize risk and make recovery easier. They’re worth the trade-off in maneuverability for anglers who stay in calm water.
Fishing PFDs
Fishing-specific PFDs have pockets, tool attachment points, and trim cuts that sit higher on the torso—they don’t interfere with casting and stay in place better during a swim. Always prioritize wearability. If it’s not comfortable, it won’t be worn.
Cold Water and the 1-10-1 Principle
This section is potentially the most important in this guide, especially for spring and fall paddlers.
Cold water immersion triggers cold shock response within the first minute of submersion. Heart rate spikes, you gasp involuntarily, and if you inhale water during that gasp, you can drown before hypothermia even becomes a factor. This is why drowning in cold water happens so fast—it’s not always hypothermia.
The 1-10-1 Rule (from Gordon Giesbrecht, hypothermia researcher)
| Phase | Duration | What’s Happening |
|---|---|---|
| 1 minute | First 60 seconds | Cold shock. Focus on breathing. Don’t panic. |
| 10 minutes | Next ~10 minutes | Swimming capability. Do your self-rescue now, while you can still use your hands and arms. |
| 1 hour | After ~1 hour | Hypothermia incapacitation. You can survive this long if you stay afloat—but you can’t self-rescue. |
The implication is direct: in cold water, your window to perform self-rescue is about 10 minutes. Practice your technique until you can complete it in under five.
Water Temperature Guidelines
- Above 70°F: Standard swimwear is acceptable for most recreational paddling
- 60–70°F: Consider a wetsuit or paddling jacket
- 50–60°F: Full wetsuit minimum
- Below 50°F: Drysuit recommended; never paddle alone
A wetsuit or drysuit doesn’t eliminate cold shock, but it significantly extends your functional window and reduces the risk of cardiac response from the initial immersion.
Practice Drills: How to Build the Muscle Memory
Reading about self-rescue is useful. Doing it once in a controlled setting is better. Doing it ten times is what builds the skill that holds under pressure. Before any session on the water, run through our pre-launch kayak safety checklist to make sure you have your gear dialed in.
Drill Structure for Beginners
Session 1 (Shallow, Warm Water Only)
- 5 wet exit reps
- 5 scramble rescue attempts from the same side
- 5 scramble attempts from the opposite side
- Rest between each
Session 2 (Add Gear)
- Practice inflating your paddle float out of the water
- 3 timed paddle float rescues (aim to complete each under 8 minutes)
- Practice stowing paddle float and bilge pump while seated in kayak
Session 3 (Add Variables)
- Practice in light chop if available
- Add a loaded dry bag to simulate real paddling conditions
- Time each rescue and track improvement
Optional: Practice in Cold Water If you regularly paddle below 60°F, one session of cold water practice—supervised, with a partner and shore support—is worth doing. Experiencing the gasp response, the cold grip on your hands, and the reduced strength in a controlled setting is genuinely eye-opening.
Partner vs. Solo Practice
Solo practice is valuable. Partner practice is better. A practice partner can:
- Stand by for safety in case something goes wrong
- Film your technique so you can review it
- Time your rescues
- Provide an assisted rescue option while you learn (T-rescue from their boat)
Local kayak clubs and outfitters often run self-rescue clinics. One afternoon with an instructor will accelerate your skill more than ten sessions alone.
Quick Reference: Which Technique for Which Situation
| Situation | Best Technique |
|---|---|
| Wide recreational kayak, calm water | Scramble rescue |
| Narrow sea or touring kayak | Paddle float rescue |
| Limited upper body strength | Heel hook entry |
| Sit-on-top kayak, open water | Cowboy scramble |
| Cold water (under 60°F) | Paddle float rescue (fastest secure method) |
| Kayak fishing setup | Cowboy scramble or scramble depending on boat width |
| Practice with partner | Any method, with assisted T-rescue as backup |
Final Thoughts: Confidence Through Practice
There’s a specific kind of paddling confidence that comes from knowing you can handle a capsize. It changes how you feel on the water—less anxious about conditions, more willing to explore, more present in the experience. That confidence isn’t recklessness; it’s competence.
None of these techniques are difficult to learn. All of them require actual practice in the water to be useful. Start this weekend in knee-deep water if you can. Practice until the scramble feels boring. Then practice the paddle float rescue until that feels boring too.
The paddlers who handle capsizes calmly aren’t calm because they’re fearless. They’re calm because they’ve done it before.
Frequently Asked Questions
What is the easiest kayak self-rescue method for beginners? The scramble rescue is the easiest to learn and requires no gear. It works best on wide recreational kayaks (26+ inches wide) in calm water. Most beginners can learn the basics in one pool or shallow-water session.
How do I get back in a kayak from deep water without help? The paddle float rescue is designed for deep water solo recovery. You inflate a paddle float, attach it to one blade, lay the paddle across the rear deck as an outrigger, and use it to stabilize the boat while you pull yourself back in.
How long do I have to perform self-rescue in cold water? Using the 1-10-1 principle: approximately 10 minutes of effective swimming and arm function after the initial cold shock. Practice until you can complete your preferred technique in under 5 minutes.
Do I need to learn the Eskimo roll? No—it’s a valuable advanced skill but not required. Self-rescue techniques provide reliable alternatives and should be practiced by all kayakers, including those who can already roll.
What gear do I need to practice self-rescue? Minimum: a properly fitted PFD and a kayak. Recommended: an inflatable paddle float, a bilge pump, and a spare paddle leash. A wetsuit is essential if practicing in cold water.
How often should I practice kayak self-rescue? At least once a season, ideally once a month if you paddle regularly. Skills fade—specifically, the muscle memory for smooth body positioning tends to decay faster than people expect.